How to send emails in Laravel using Mailtrap
By Giuseppe Maccario on July 3, 2022 in Laravel, Local development, Mail, PHP
In this article, I’ll explain what is Mailtrap Email Testing, and how to send emails from your local development Laravel project using Mailtrap.
Introduction
In 2020 I was developing a platform, based on Laravel, that made extensive use of cron jobs and email sending. The cron jobs check some values on the database, and the scripts take care of sending emails. Each email typically uses a Blade template built in HTML. So I needed to test how the messages were viewed by the end-user on Desktop, but also on tablets and mobile. How to do this?
Testing is essential to developing a professional product. Unfortunately though, sending an email in PHP from localhost is not a simple thing, just see how many discussions there are about it on the internet: developers have to configure some settings in the php.ini files, or in the sendmail.ini, and sometimes, despite there is no error in the code or no error written in the logs, it seems impossible to succeed in sending the emails. The process becomes frustrating and turns into a waste of time.
What is Mailtrap?
After some research, I discovered Mailtrap Email Sandbox, a service that you can use to “trap” e-mails, without actually sending them to the intended recipient. Mailtrap Email Testing is a service with paid plans, but with a free plan available, recommended to test the service or to use it for a personal project. The personal free plan has some limitations, such as the maximum monthly number of emails that can be trapped with Mailtrap, which is 100 emails per month.
How does Mailtrap work?
Straight from their help page: Mailtrap Email Sandbox captures your emails in a virtual inbox so that you can test and optimize your email campaigns before sending them to real users.
Mailtrap Email Testing is well known among web developers as an online tool for securely testing emails in development and staging environments. It is often used as a fake SMTP server to capture test emails, display them in virtual mailboxes, and debug them before sending them to real users.
How to configure Mailtrap
Firstly, you need to create a Mailtrap account, simply create an account at https://mailtrap.io. You can create an account by leveraging your Google, Github, or Office365 account. However, you can register your new account in the most classic way, with email and password.
After you log in successfully, the homepage will appear.
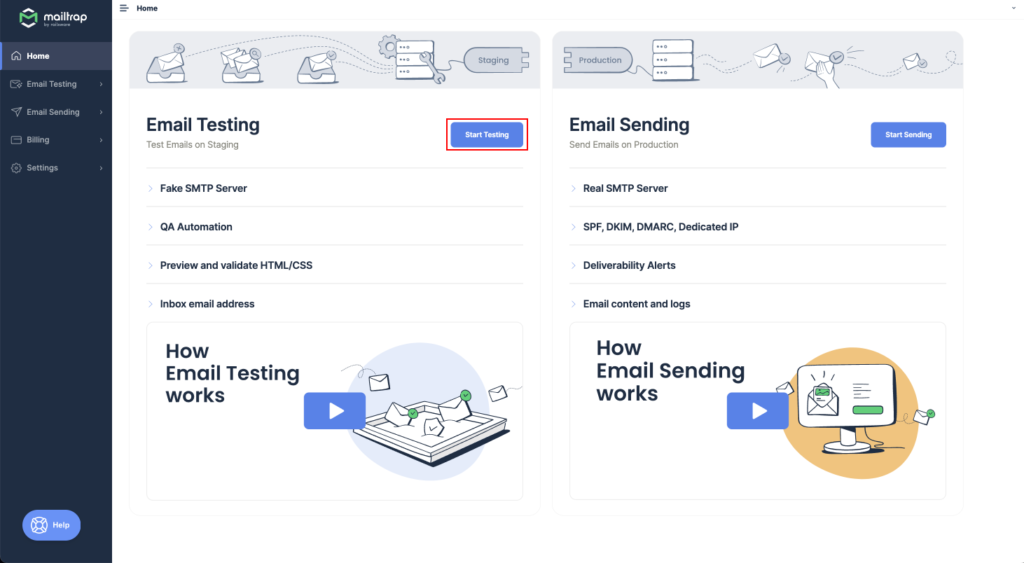
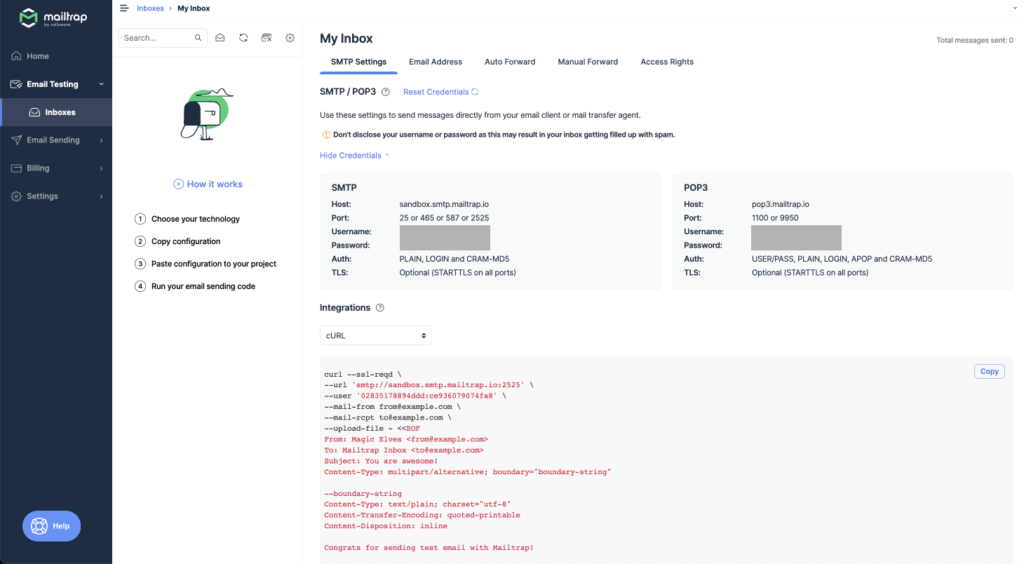
After that, you can retrieve the SMTP/POP3 credentials of your account and use them in your Laravel (PHP) project under development. Then click on the Start Testing button and then on Show Credentials:
How to configure Laravel
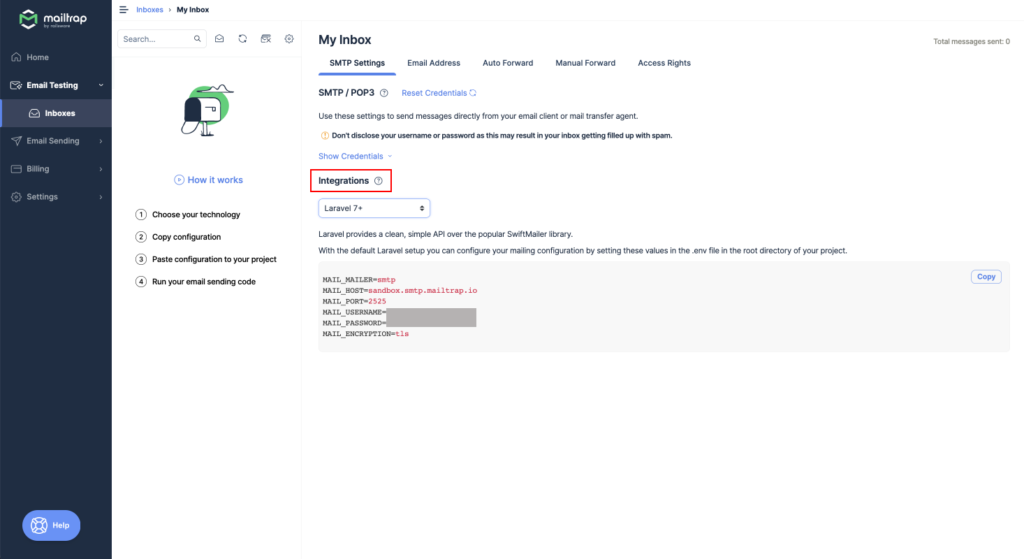
Mailtrap offers the ability to integrate its functionality into various programming languages and frameworks. In addition, it offers pre-configured snippets for use in your own projects. Simply click on Integrations:
Here is the list of available languages:
- Command Line
- Ruby
- Python
- PHP
- Node.js
- Java/Scala
- Perl
- C#
- Other
In this article, we look at integrating Mailtrap into a Laravel project.
Laravel provides a clean and simple mailing API thanks to the popular SwiftMailer library. By Laravel’s default, you can set up your own mailing configuration by setting some values in the .env file in the main Laravel project directory.
MAIL_MAILER=smtp
MAIL_HOST=smtp.mailtrap.io
MAIL_PORT=2525
MAIL_USERNAME=xxxxxxx
MAIL_PASSWORD=xxxxxxx
MAIL_ENCRYPTION=tls
And you’re done! Now let’s see how to send emails in Laravel using Mailtrap.
It is time to configure your views. Each email in Laravel uses a Blade template to display its content. The Laravel documentation is very clear and comprehensive and is available at this address: Mail – Laravel.
Here is a step-by-step list for creating an email in Laravel:
- Create a “mailable” class with the following artisan command: php artisan make:mail OrderShipped
- configure the sender (from) in the build() method of the newly created class
- set the subject (subject) of the mail in the build() method of the newly created class
- configure the view in the build() method of the newly created class
- configure any parameters (with) that you want to pass to the view via the constructor and class attributes
- construct the HTML view that will be displayed by the user
- write the code that calls the “mailable” class and actually sends the email: Mail::to($user->email)->send(new OrderShipped($order));
Mailtrap inbox
At this point, you will test the send. Once you have run the necessary code in Laravel to send the intended emails, simply open the Mailtrap Email Testing inboxes page, select the inbox you created earlier, and check if messages have arrived.
We can now fix any message display problems and be ready to release into production great layouts and professional templates for our emails.
In conclusion, it’s very easy to set up a Mailtrap account in order to test your email templates in your local environment.
If you have any questions or concerns, please write to me via the contact form.